In this video tutorial, I will share with you my techniques for blending and softening the edges of your watercolors. I use these blending techniques to create all of my paintings.
Working with Water
Whenever you paint with watercolors you will want to have one water jar to clean your brushes and another water jar to pick up clean water in your brush.
It's good to practice blending with water only. It's important that you learn to judge the amount of water in your brush so that you can have better control of your paint.
I like to wrap a roll of soft bath tissue with 4 sheets of absorbent paper towels to use as a tool while I'm painting. I like to wrap Viva Paper Towels around Charmin.
I will dip my brush into my water then set the brush on the paper towels to absorb some of the water.
Practice taking different amounts of water out of your brushes.
50% loaded brush
Start by loading your brush with water, then touch the brush to your roll of towels. Allow the thick towels to pull the water out of your brush.
Take about half the water out. This is what we will refer to as a 50 percent loaded brush. Do this with each of your brushes. Get to know what a 50 percent loaded brush feels like.
If you are having too much water flow from your brush while painting, you need to adjust the dryness of your brush. If the brush is too wet, allow it to set on the paper towels a few seconds longer.
When my brush is at a 50 percent load of water the wet shine has disappeared from the brush.
damp brush
When you remove about 90 percent of the water from your brush it is referred to as a damp brush. Sometimes I will refer to it as a thirsty brush. It is almost dry.
blending exercise:
Step 1
- Dip your brush into your clean water container.
- Take 50 percent of the water out and then pick up color.
- Set it down on your palette and mix the water and color. Get any lumps out.
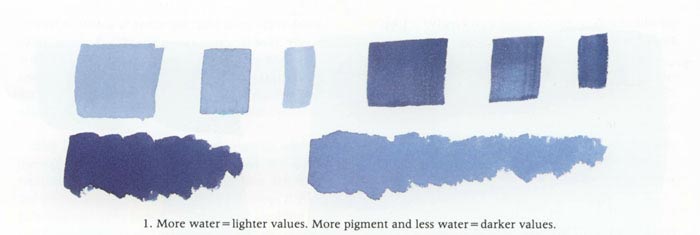
Notice the value of this. If you add more water it will get lighter. This is one way to change values. If you add more pigment with a drier brush it will become darker.
- Take your flat brushes and paint a flat stroke. Try this with each of your brushes. Notice that the water and pigment work together. Watercolors will dry lighter.
- Next, try this with your round brush. Use the round brush on its side and work away from your starting point. Play with it and see what happens.
Step 2
- Use the flat brush and paint an area only 1" long.
- If you are using a synthetic 20 flat, as I do, you will need to remove a little more than half of the water.
- We will refer to this as removing 60% of the water.
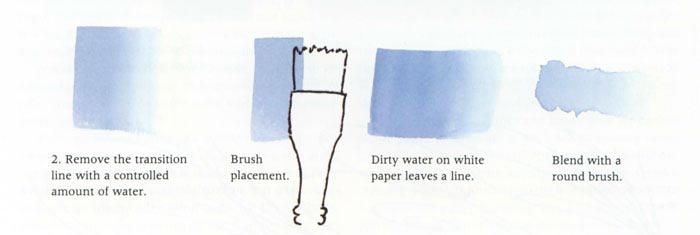
- Apply this to the edge of the stroke to soften the transition line.
- Straddle the line—place the brush half on the line and half on the clean paper.
- This deposits water on the paper for the line to move into and fade. It will not go farther than the water.
I use a short choppy, overlapping stroke rather than trying to do it in one long stroke. Practice.
Then try the same with a round brush. This is an important skill, so practice it until you have mastered it.
It is important to stress that even a tiny amount of color in your clean container can mark the paper. This is true especially when your final blending is into white paper.
Step 3
Sideloading with watercolor is a little different than with other mediums but the goal is the same. You want to load the brush so the stroke has color on one side and fades gradually across leaving no line on the other side.
Here's how:
- Dip your brush into clean water and remove 60% of the water from the brush.
- Touch the brush side into the paint so just about ten hairs at the outside edge pick up the color.
- Holding the brush in a horizontal position with the bristles in a vertical position rather than flat, touch the brush side into the paint so just about ten hairs at the outside edge pick up the color.
- Touch the flat surface on your palette and move the brush back and forth until the paint starts to flow across the brush.
- Now apply it on your paper. Use short choppy strokes to apply the color. Re-clean and reload each time.
If you had problems, check if you are using a 60 percent loaded brush. If it bled too much, try a little less water.
When you have mastered this skill, try this;
- Load your brush the same way.
- Set it down and make a stroke; then pick up the brush, overlap the last stroke and pull it down again.
- Repeat and repeat on the same stroke. This deposits a larger area of color and still fades out at the edge. I refer to this as "walking the color over."
- Practice this with all of your flat brushes, especially the 2-inch.
The hard part is over. If you can master these skills, the rest is a piece of cake.

Step 4
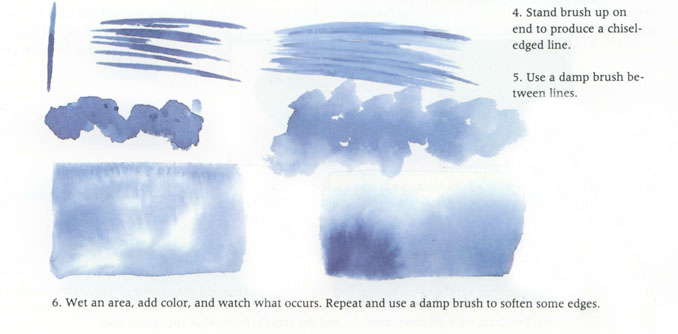
- Use a no. 10 or no. 20 flat bright and paint some chisel edge lines.
- Quickly clean and reload this time to a damp brush (which means take about 90 percent of the water out).
- Now take the damp brush and chisel between the lines on the paper. They should bleed, but not become smooth. This should create the look of several values and create what is called texture in watercolor. If it got too dry, try again with a tad more water.
- Only paint 1 or 2 inches at a time on anything you want to blend this way or the paint will dry too fast to blend. This is great for adding a textured look to barns, some leaves, and trees.
Step 5
- Apply paint in the manner shown to an area no larger than shown with a round brush.
- Get a 50 percent load of clean water on your round and touch it to all the edges, allowing the pigment to bleed into the water.
- This will create lots of value change. It is a fun way to create texture or a streaked look to flowers.
- The brush is moved back and forth horizontally.
How to blend a Transition Line
When you apply a color on a subject and wish it to gradually fade to no line, you have several choices which I will share below.
If you are working on dry paper, you may use a no. 20 flat with about half of the water removed from the brush.
-
Position your brush so that it is touching the edge of the color on your paint palette.
-
Pick up some paint on one side of the brush.
-
Set the brush down onto your palette and pull down.
-
Then lift up the brush and set it back down slightly to the right of the line you've created on the palette then pull back.
-
Do this a few times on either side of the line being sure the paint does not fill more than half of your brush.
-
Set the brush flat on the paper so it is depositing water along the side of the paint line.
-
The color will flow until it hits dry paper, then it will stop. This is the reason that you want to use a brush that is at least as wide as a no. 20.
-
Use short, overlapping strokes as if you are caressing the paper.
-
-
Allow the water to do the blending.
To remove a line on a wet surface, simply use a much drier brush. (1 refer to this as a thirsty or damp brush.) Remove as much water from it as possible. It should feel as you would if you towel-dried your hair until it was just damp.
You may choose to blend with a round brush in the same manner.
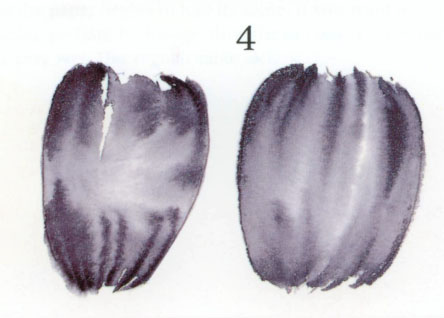
Creating Streaks
-
Wet the petal with water (see 4).
-
Apply the color with the round and then clean the brush.
-
Remove the water to a damp stage.
-
Place the brush along the edge of color and pull toward the center then out toward the edge, directing the color. Try and leave the bulk of it where it was first placed. Remember that you are just directing the color. Allow the water to do the work.
Side Loading
Most often, this will be done on dry paper. If you choose to do this at the damp stage, simply use less water. Remember that more than half of the brush will carry water.
-
Mix the color in a thick puddle or pick up the paint right out of the well on your palette.
-
Use the largest flat possible. Fill the brush with water.
-
Remove 60% of the water, and dip the side of the brush into the color.
For the color to begin to fade across the brush, make a blending stoke on the palette. -
Move the brush so it straddles the center line that was created.
-
Move it to the right.
-
Pull it down then move to the left and pull down.
-
Your goal is to get it to blend the centerline on the brush.
-
-
Set the brush flat on the paper and pull overlapping strokes, again caressing the paper. This blends your color with little effort if you can master it.
-
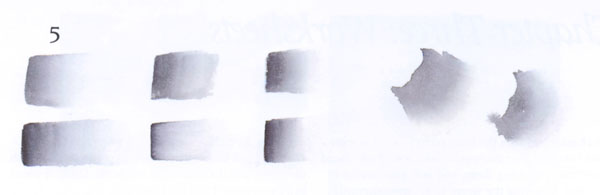
Look at illustration 5. The two strokes on the left (top and bottom) were done with the 1-inch brush. Notice how they fade to the right.
The two in the center show you some possible problems.
-
The top one shows you what happens when the color travels all the way across the brush.
-
It creates another transition line. The bottom one gives the appearance of a dark line to the left, caused by too much water pushing the pigment to the edge.
-
-
The two on the right are done correctly with the size no. 20 (they fade to the right).
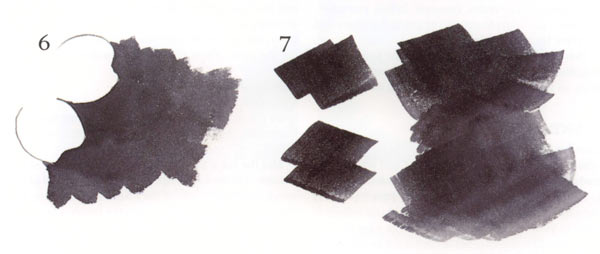
Covering a Large Area With a Round Brush
This is something you might do on a background. It could be a solid black background or a background with color changes. Decide on a starting and stopping place. Perhaps there is a leaf that touches the edge of the paper or a petal that reaches off. If you are working toward a smooth background this is important. If it is not smooth, then don't concern yourself.
-
Begin at the edge of the subject. (see 6).
-
This is a good way to clean up edges.
-
-
Use the round brush as if you were mopping a floor.
-
Use the belly of the brush on the paper. As you work away from the subject you are creating wet edges. As much as possible, try and work the next brush load into the wet edge. As you will see, it is best to work in one direction, and it’s easier if you have a starting line that you don’t have to blend.
-
Since you can’t work to the right and left, you may want to blend one side with water. That way it won’t form a hard line before you get back to it.
-
-
Painting a Dark Background With a 1-Inch Flat Use thick, juicy paint. Fill the brush and pull a few strokes about an inch long (see 7).
-
Make the strokes on an angle as if you were going to make an x (Don’t actually make an x—that just gives you the direction.)
-
Each time you fill the brush, change the color.
-
Allow each color to merge. If you want this very dark, it may have to be done twice.
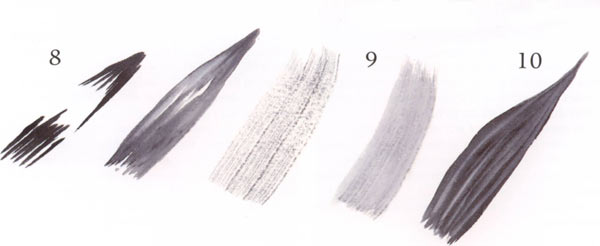
Chisel Blending
Many times I use this when painting something like a long tulip leaf.
-
Apply the color with a flat brush (see 8).
-
Leave lots of white paper.
-
Prepare the flat brush so it carries about 50 percent water.
-
Chisel into the edge of the color, directing it to the length of the leaf.
Using a Rake Brush
-
Fill the brush all the way to the ferrule.
-
If you paint on dry paper it may appear harsh (see 9, left). However if you take this same brush and, while the pigment is still wet, brush over it with a 50 percent loaded brush, it will appear softer (see 9, right).
-
Lifting Color
-
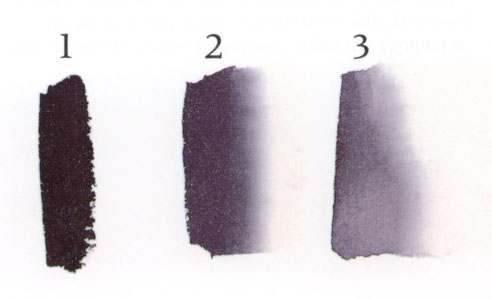
To create leaf veins or form a leaf, start with a very dark base on the leaf.
-
Lift the veins using a chisel edge on a dampened flat brush.
-
If you want to actually lift more color out to create form, you may use the same brush. If you have a short, worn-down brush this works even better (see 10).
-
Most oil painters do what is called a rub-out painting. That is where the colors are placed on, then the values are created by lifting or rubbing off the color. This is the same principle. You use water on the brush to loosen the pigment and lift off the color.
Wet Watercolor Paper
Many paintings have what is called the wet stage. It is a layer of color used to tone the paper. When these colors dry, they become the lightest colors on the paper. This may end up a soft color in the background. It may provide tints on the flowers and leaves.
-
Wet the paper until it is evenly soaked.
-
Allow the water to penetrate the inside of the paper.
-
Apply your colors with a large, flat brush.
-
With a damp, thirsty brush, soften the edges where the colors meet.
-
When the paper has lost its shine, dry it with a hairdryer until it is bone dry.
-
Soak up any water that might be on your table or support board so it will not run back as your paper dries.
To do layering, the most important thing is to dry the paper thoroughly before applying the next layer. If the paper is not completely dry, the water inside the paper may mix with the new water you apply and create blooms or lines that you don't want.
Dropping Salt
If the instructions direct you to do this, here is how:
When you have blended the colors of the wet stage, watch the paper dry. If you want little stars, drop salt as the paper begins to lose its shine. If you want larger holes, perhaps for foliage, drop the salt when the paper is very wet. Use regular table salt.
I hope you enjoyed this tutorial.
Louise

If you love this technique and want to learn more about painting beautiful florals, landscapes, or still lifes with Louise, you can purchase individual painting classes below. Click on the images to see a large image of the full painting along with a picture of the free bonus painting packet.